What is a storyboard?
A storyboard is a method used in film or animation, to visually convey a story. Similar to a comic strip, a storyboard is laid out in a series of sequential sketches. Storyboards show what camera angles are being used, what characters are in the frame, and what the characters in the frame are doing or saying. A storyboard is a good way to draft a scene shot by shot, so that you can make changes easily, at an early stage, before production begins. The frames are normally sketched in a simple manner, just using basic outlines of shapes and backgrounds, and stick figures - there is no need for detail works of art at this stage.
Storyboard Language:
There are many terms used in storyboarding, to describe the camera angles, movement, and transitions between shots.
1. Camera.
Close-Up Shot. The camera is close to the subject, to focus on what they are saying, or to show facial expressions. With a character, this normally involves focusing on the shoulders and above.
Medium Close-Up Shot. The camera focuses on a single subject. With a character, this normally involves focusing on the waist and above.
Extreme Close-Up Shot. The camera focuses on a single feature of the subject, i.e the mouth, a hand, etc. This serves to draw attention to it.
High Camera Angle. The camera looks down on the subject. This serves to make the subject seem small, weak, or unimportant. It can also be used to give the impression that the subject is being watched by a more powerful presence.
Level Camera Angle. The camera angle is even with the subject.
Wide Angle. The whole subject is shown, placed in context in their surroundings.
Long Shot/Extreme Wide Angle/Establishing Shot. The camera is far away from the subject. This serves to show a wider view of the subject's surroundings.
Over the Shoulder Shot. This shot is used to put the focus on the main subject, to show that what they are saying or doing is of higher importance than the secondary subject.
Low Camera Angle. The camera looks up at the subject. This serves to make the subject seem more powerful and important.
Point of View Shot. The camera mimics the vision of a character in the scene.
Reaction Shot. This can be a shot of someone looking off-screen. It can also be a shot of a person that is being spoken to, so that we can see their reactions.
Tilted (Dutch) Shot. The camera is at a tilted angle. It is used to give the feeling of unease, and makes the viewer feel off balance.
Two Shot. The camera shows more than one person, but shows them at the same angle/distance. This is used when a conversation is happening, between people whose actions/words are intended to be equally as important as each other.
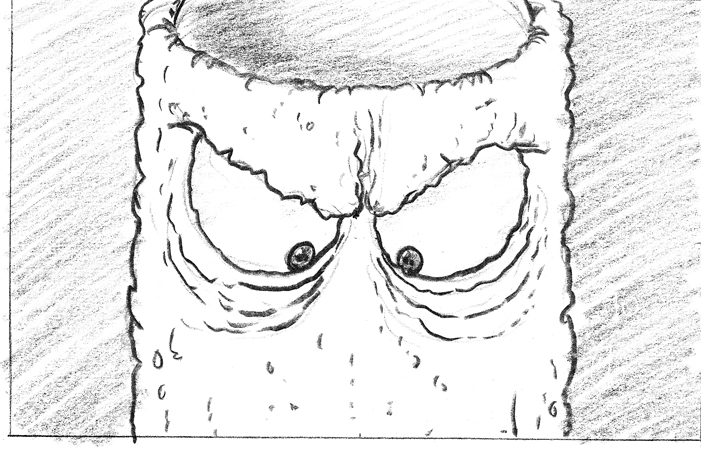 |
| Extreme Close-Up (brianlemay.com) |
2. Movement.
Pan. The camera moves steadily across from one part of a scene to another.
Tilt. The camera moves up or down, so that it can follow the action or the subject.
Track. The entire camera moves to follow a moving subject.
Track. The entire camera moves to follow a moving subject.
Zoom. The camera moves closer to the subject, or further away from the subject. Also known as "Truck". Zoom/Truck in is used to draw the viewer's attention towards something, and Zoom/Truck out is used to reveal something to the viewer that was initially hidden.
Reveal. The camera stays in place, but the subject moves through the frame during the shot.
Rack Focus. The camera has one subject in focus, and others out of focus, and then the focus changes to a different subject in the same scene.
Reveal. The camera stays in place, but the subject moves through the frame during the shot.
Rack Focus. The camera has one subject in focus, and others out of focus, and then the focus changes to a different subject in the same scene.
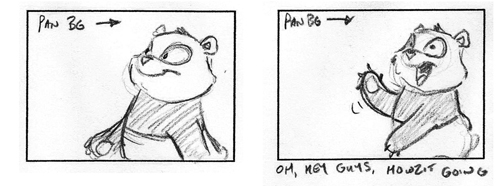 |
| Background Pan (brianlemay.com) |
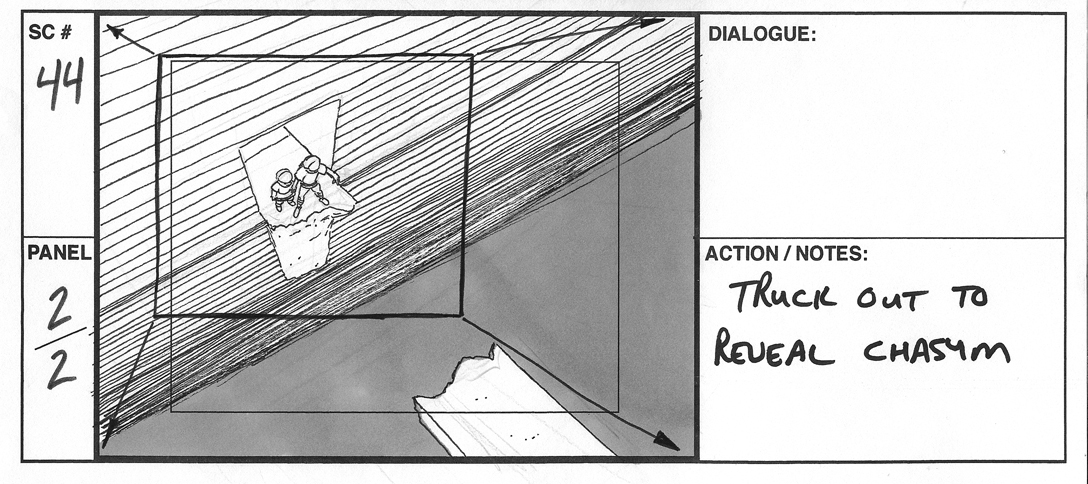 |
| Truck Out (brianlemay.com) |
3. Transitions.
Dissolve. The first shot fades out, while the next shot simultaneously fades in.
Fade Out. The scene gradually darkens, until the scene becomes black. Can be used at the end of a scene to imply that time has passed between scenes.
Fade In. A black scene gradually brightens, until the desired scene is visible.
Jump Cut. The view changes abruptly from one scene to another, or from one frame to another frame in the same scene. This is often used to disrupt the flow of time, or to make the scene seem more frantic, or chaotic.
The 180 Degree Rule:
In Jennifer Albright's article, How to Make a Storyboard - Storyboard Lingo and Techniques, she talks about the "180 degree rule". This is a convention used to maintain visual acuity, and to stop the viewer from becoming disoriented. Consider the master shot shown below:
 |
| Dissolve (brianlemay.com) |
 |
| Fade to Black (brianlemay.com) |
The 180 Degree Rule:
In Jennifer Albright's article, How to Make a Storyboard - Storyboard Lingo and Techniques, she talks about the "180 degree rule". This is a convention used to maintain visual acuity, and to stop the viewer from becoming disoriented. Consider the master shot shown below:
 |
| videomaker.com |
The overhead shot shows an imaginary line drawn between the two subjects. Keeping the camera on the same side of this line is desirable, for both the viewer and the editing staff.
 |
| videomaker.com |
The scene above keeps the 180 degree rule in mind. The close up shots of each subject are consistent with the way they are facing in the master shot. Here is what the shot will look like if the 180 degree rule is broken:
 |
| videomaker.com |
This shot is disorientating, because they are now seemingly facing the same direction, rather than facing each other. Sticking to the 180 degree rule will save a lot of time later in the editing room.
Time to get sketching!
No comments:
Post a Comment